


Okay, I'd take a short break, but then I remembered that I've already prepared this post a while ago, with items that could be made for the holiday season. They could make a great Christmas gift! It seems that free baby-knitting patterns remain popular on the internet. These small projects are quick to make, you can use your left-over wool and finish them just in a few evenings. I've already done a post on testing 3 free available baby bootee patterns from the internet here. Today I have another baby bootee and bonnet pattern from 1965, with a definite vintage air! Cute, isn't it?


These booties have shaped toes and heels. The original pattern uses the classic white/pink (pr white/light blue) combination. Unfortunately there is no contrast visible on the original, black-and-white picture below, it seems all white.
Actually the moss-stitch parts are knitted in the contrasting color (pattern instructions: pink) and the 'bobbles' are white. I think a bolder, modern color combination like bright blue and yellow or grey and yellow, grey and bright blue or pale green with pink could work just as great! Below details of the construction (made up a bootie) and a detailed explanation of how to knit the two-colored bobble-pattern! You find the original patterns at the end of this post.
stitches & patterns used

moss-stitch:
The edges and the sole of the booties are knit in Moss stitch (also referred as 'M-st.' in the instructions). Moss stitch is simply altering knit and purl stitches followed in the next row by purl above knit stitches and knit above the purl stitches:

two-colored bobble-pattern:
The main pattern is knitted in two colors. There are 'bobbles' in the main color (here white) and in between stripes in the contrasting color (here gray):

pattern chart:

One pattern unit is 6 rows tall and 3+1 sts wide.
bobble-pattern step-by-step:
1. the pattern starts with 4 rows in stocking stitch (knit on the right side and purl on the wrong side)

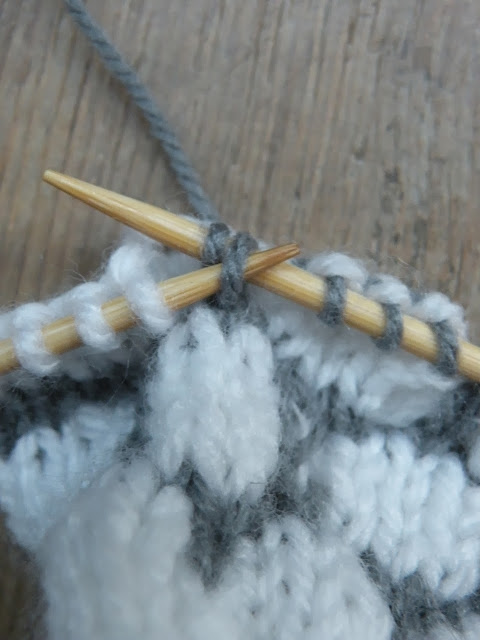
2. start the next row in the contrasting color. The pattern is formed by 3 knit stitches followed by a 'drop-stitch':


3. drop the stitch until the colored stitch and pick that one up (you will have 4 strands of wool above that stitch)


4. put your needle under the 4 strands, pick up the wool and pull it through as if to knit (now you have the new loop on your right needle and the original stitch next to that)


5 now pass the original stitch over the loop you just made: pick up the original stitch with your left needle and lift it over the loop

Your finished stitch (left) the wrong side of the work (right):


material and sizing:
- The yarn specified in the instructions (see below bonnet pattern) is a fingering weight yarn, with no.10 needles (metric 3,25) and 7 sts per inch. My guess is, the finished items should definitely fit a 0-4 month old baby.
- I used for my sample a slightly heavier, sport/baby weight yarn with metric size 3 needles. My gauge: 6 sts per in. My finished size from heel to toe: 9 cm (3,5 in). According to baby boot charts this should fit a 3-6 months old baby.


These booties are knitted top down. First step is to knit the straight, patterned part above the ankle. After making a row of holes for the tie you separate the stitches in 3 sections. You continue working on middle section for the instep. The turn is made by picking up stitches at the sides, just like when knitting a sock. You finish after decreasing in an angle for the toes. The bootees have a seam along the length of the sole up to the back. As always, I suggest using a flat seam finish to avoid bulky seams inside. (See link under tab 'knitting hints')


my pattern modifications:
- instead of 'make one' (m1) by picking up a strand from the previous row I used 'yarn over' to make the holes around the ankle for the tie. A yarn over makes larger holes which are easier in use imo:

Warning: I'd strongly recommend to use a crochet chain or other elastic material instead of a ribbon for safety reasons. Though they look pretty, ribbons are not elastic. When pulled too hard they can be potentially dangerous!

bonnet pattern:
To make up: join back seam from fastening off to first decrease. Sew on ribbon.

Courtesy & source of all newspaper images: AWW through Trove.
No comments:
Post a Comment